Sunday, February 28, 2010

Apple Walnut (Whole Grain) Bread Pudding...


Last week I had the total treat of visiting Jocelyn! And If her company alone wasn't just wonderful by itself, she took me out to breakfast at Bob's Red Mill ( A terrific bakery). I bought some Wholesome Cinnamon Raisin Oatmeal Bread....However the bread turned stale pretty quick. I was using it to make terrific toast, but decided to use the rest of it to make this lower fat, lower sugar bread pudding. Which did not taste low fat or low sugar. I was surprised this recipe didn't call for any eggs...which was perfect for me, since I didn't have any at the moment. This old-fashioned treat seems more like an autumn desert, but it was delicious in February.I mean don't appley-cinnamony things deserve the right to be enjoyed all year ? Love, Amy

"The Lord is my Shepherd, I have all that I need." ~Psalm 23:1

Ingredients:

4-5 cups whole grain bread cubes
1 1/2 peeled and chopped apples (I used fugi )
1/2 cup chopped walnuts
1/2 raisins
1/2 old fashioned oats
2 T. ground flax seed meal
1-2 t. cinnamon (honestly I just shake it in)
1 shake of nutmeg (about a 1/2 t.)
a sprinkle of salt
2 cups milk (whatever you use for your cereal, or almond milk might do nicely)
1 t. vanilla
1 t. rum flavoring
1/4 -1/3 cup agave syrup (and a little to drizzle over the top if you choose)
3 T. butter melted (You can omit this all together if you want)

Mix all ingredients together and let sit for 10 minutes to soak up the moisture. Pour mixture into a prepared baking dish, I used a glass pie pan. Bake at 350 for 20-25 minutes. Serve warm.

(recipe adapted from weheartfood/apple breadpudding)

Saturday, February 27, 2010

Eggplant Parmesan


Eggplant Parmesan

  1. 2 medium eggplants
  2. 1/2 cup to 3/4 cup milk (may need more or less)
  3. 1 cup wheat germ
  4. 1 cup soft Italian breadcrumbs (see previous post)
  5. 1 teaspoon dried basil
  6. 1/2 teaspoon each dried oregano and thyme
  7. 1 batch tomato sauce ( see recipe included... this is half the reason why this recipe is so good!)
  8. 1 pound mozzarella cheese thinly sliced or grated
  9. 1/2 cup or more grated parmesan cheese
  • Preheat oven to 375 degrees
  • Lightly oil a baking tray and #2 9x13 pans
  • Cut eggplants in rounds about 1" thick
  • Place the milk in a shallow dish; combine wheat germ with bread crumbs (if using) and herbs on a plate. Dip each eggplant in the milk, moistening both sides, then coat it thoroughly with the wheat germ and breadcrumb mixture. (I found that using a spoon to pile the mixture on each slice and then to lightly pat the breadcrumb mixture on each side helped get each slice well coated with breadcrumbs).
  • Spread out the slices on the prepared baking sheet and bake until tender, about 20-30 minutes. You can flip the slices halfway through to crisp on both sides.
  • After the eggplant is tender leave it to cool a bit on the baking sheet....you just want it cool enough to handle.
  • Spread a little sauce over the bottom of the baking dish, arrange eggplant slices along the bottom of the 9x13 pan... you may need another 9x13 or just another 8x8 depending on how many slices of eggplant you end up with (9x13 holds 6 slices, 8x8 holds 4)
  • Place one slice or about 3-4 tablespoons of grated mozzarella on top of each eggplant slice.
  • Then spoon about 1/4 cup of the tomato sauce on top of the mozzarella.
  • The sprinkle the tops of each mound with the grated parmesan.
  • Bake at 375 degrees for 30 to 40 minutes (checking after about 25 to makes sure the sauce on the bottom isn't burning, add a little water (about 1/4 cup) if it's starting to) or until all the cheese is melted and starting to brown lightly.
We hosted our couples prayer group at our house this month and our being Catholic, and this being a Friday of Lent... we needed to serve something that did not have meat in it. I am a carnivore :) and usually always serve a meat centered main dish for company. Thanks to this beautiful season of prayer and fasting I was challenged to reach outside of my comfort zone and find something new to prepare. This recipe was FANTASTIC, and several of our guests requested the recipe after our gathering... a serious crowd pleaser! THANK YOU to my sister Jessica for sending me this gem!

Easy Tomato Sauce
3 Tbs olive oil
2 cups chopped onion
2 tsp dry basil
2 tsp dry oregano
1 1/2 tsp salt
1 large can petite diced tomato (or crushed tomato)
1 med size can tomato sauce
1 little can tomato paste
1 Tbs honey
lots of black pepper
4-6 cloves of minced garlic

1. Saute the onions in the olive oil over med heat. Season with salt and herbs and continue to cook until the onions are very soft.

2. Add the diced tomatoes, sauce, paste, honey and black pepper. Bring to a boil, lower heat and allow to simmer partially covered for 30 minutes.

3. Add the garlic, adjust seasoning (if needed) and allow to cook 10 minutes more (I let it simmer on the lowest setting for a few hours and it was fantastic!)


ENJOY AND BE BLESSED!
Love, Jocelyn


Homemade Soft Breadcrumbs


You can use this recipe to make different flavors and amounts of breadcrumbs... they're super simple, healthy, and delicious! I made these particular breadcrumbs for eggplant parmesan... but they can be used for all sorts of things. Be creative, try different spices and let us know what you discover!

Homemade Soft (Italian) Breadcrumbs

  • 4 slices of whole wheat bread (I used the heels... they're drier and stiffer and made better breadcrumbs)
  • 2 Tablespoons olive oil
  • 1 teaspoon granulated garlic
  • 1 teaspoon basil
  • 3/4 teaspoon oregano
  • 1/2 teaspoon salt
  • 1/4 teaspoon black pepper
Tear up the bread slices and place in the bowl of a food processor. Drizzle the oil over the bread and add all the seasonings. Pulse the mixture in the food processor until the bread has been broken down all the way to breadcrumbs.

Enjoy and be BLESSED!
Love, Jocelyn


Monday, February 22, 2010

Almond (not homemade... gasp) Scones


So it's been awhile since I've posted... have you noticed that some weeks just consume every minute? It's a hard thing to have a creative outlet as a wife and mama and homemaker. It's a sanity thing, and I know I need this, to enjoy the gift that I have in doing the work I do. To celebrate making the mundane beautiful, and bringing HIS light into our home through gift and glory. This past week was just full, and so here I am... back in business. These scones are not homemade... you know, in reality we aren't always able to make homemade treats to bless our families. That doesn't mean our homes need to be bereft of that sweet something-wonderful-is-in-the-oven scent that floats so gently over the things we see as failures (the dusty piano, the toys that need to be sorted and put away, the booster seat that could really stand to be dunked in a tub of bleach... again) and make them muted in comparison to the miraculous aroma of baking. In many ways I think the miracle of baking is a grace from God to cover over a multitude of "failures" and remind us that EVERYTHING that is good is His.

I made these scones according to the directions on the box and just added about 1/2 cup of sliced almonds that I pulsed in my food processor until they were very finely chopped. Then I added 1 tsp. almond extract to the milk before I added that into the mix. They could have used a little more extract... maybe 1/2 tsp. more... but they were pretty delicious as is. I used them to make blackberry shortcakes. Those were so scrumptious that I was distracted and didn't think to photograph them until they were already consumed. Sometimes life is just like that... we forget, we enjoy, and we live to tell another tale.

ENJOY AND BE BLESSED!
Love... Jocelyn


Sunday, February 21, 2010

Dutch Babies


Ingredients:

6 eggs (room temp.)
1 cup milk (room temp)
1 cup flour (I used half white, half wheat)
1 t. vanilla
1/4 t. cinnamon
5 T. butter

Topping:
lemon juice
powdered sugar
strawberry jam (or whatever you like)

Preheat oven to 450. Place over rack in middle of oven. Place a large, heavy oven proof frying pan, preferably a cast iron skillet in the oven while its heating, prepare your batter.

In a large bowl, beat eggs until light and frothy; add milk, flour, vanilla extract, and cinnamon; beat for 5 minutes more. The batter will be thin, but very smooth and creamy.

Using a pot holder, remove the hot skillet from the oven; add the butter; tilting the pan to melt the butter and coat the skillet. Pour the prepared batter into the hot skillet, all at once and immediately return the skillet to the oven. Bake approximately 20-25 minutes or until puffed and golden brown.

remove from oven and serve immediately. Once out of the oven the pancake will begin to deflate. Top with your favorite topping, and gobble it down!


Maybe its because my grandma was Dutch that I'm sticking to the name Dutch Baby. Another name for these are German pancakes...but really they are very un-pancake like. They are however a delicious breakfast! This one turned out very even...but sometimes they puff up all cool, making it very fun for children to watch cook in the oven! They are very simple and easy to make, and you normally have all this stuff on hand. Hope you like 'em as much as we do! Love, Amy.

Saturday, February 20, 2010

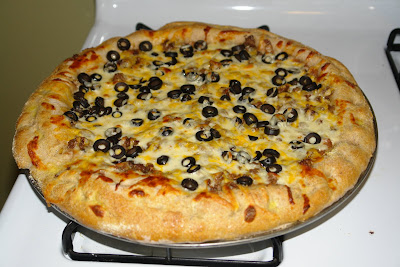
Taco Pizza


Dough Ingredients:
1 1/2 cups warm water (105°F-115°F)
1 package (2 1/4 teaspoons) of active dry yeast (check the expiration date on the package)
3 1/2 cups bread flour (I used half white, half wheat)
1 teaspoons garlic salt
2 teaspoon sugar

1 In the large bowl of a heavy duty electric mixer (such as a Kitchen Aid), add the warm water. Sprinkle on the yeast and let sit for 5 minutes until the yeast is dissolved. Stir to dissolve completely if needed at the end of 5 minutes.

2 Attach a mixing paddle to the mixer. Mix in the olive oil, flour, salt and sugar on low speed for about a minute. Remove the mixing paddle and replace with a dough hook. Knead using the mixer and dough hook, on low to medium speed, until the dough is smooth and elastic, about 10 minutes. If you don't have a mixer, you can mix and knead by hand. If the dough seems a little too wet, sprinkle on a bit more flour.
3 Place ball of dough in a bowl that has been coated lightly with olive oil. Turn the dough around in the bowl so that it gets coated with the oil. Cover with plastic wrap. Let sit in a warm place (75-85°F) until it doubles in size, I only waited about 20 minutes but you can wait an hour or so.

4 Place dough on floured surface and press out with fingers or a small roller. Work slowly, letting the dough rest periodically, to avoid tearing. This is a homemade pizza so it doesn't have to be perfectly round ...don't stress.

5 Place on pizza pan that has been dusted with corn meal if you have it

6 Now its time to decorate with your favorite toppings...whatever you like on your tacos!

I used:

refried beans as the sauce
cooked hamburger with taco seasoning, onion and garlic
mozzarella and colby cheese
olives
7 Cook at 400 for 20-30 minutes

after its cooked add...

lettuce
tomatoes
avocados
sour cream
hot sauce!


Taco pizza is a crowd pleaser. This was delicious. Jon gave me a two thumbs up across the table after his first bite. Get ready to make a mess with the dough...but while its rising and while its cooking is a perfect time to clean up....Then after the pizza is cooked, all that's left to do is enjoy! Love, Amy.

Sunday, February 14, 2010

Slow-Cooked Tapioca...


Ingredients:

8 c. of milk ( I used 6 cups milk and 2 cups heavy cream because I had it)
3 eggs lightly beaten
1 c. tapioca pearls
1 1/3 c. sugar
3 t. vanilla

Mix all ingredients in crock pot. Cover and cook on low for 5-6 hours. Stirring occasionally. Serve warm. This makes a whole pot full, and the recipe could easily be cut in half if you didn't want that much.

Oh my goodness! Did you ever dream you could make this delicious pudding in a crock pot! (No more standing at the stove and stirring forever!) Whoever has already heard of such a wonder, should have passed this information to me along time ago. Wonderful, dreamy, creamy....mmmmm!

Tandoori Chicken...


Marinade Ingredients:

1 c. plain yogurt
1 1/2 T. lemon juice
1 t. curry
1/2 t. cayenne pepper
1/2 t. pepper
1/2 t. ginger
3 cloves garlic
1/2 t. dried mustard
1/2 t. red pepper flakes
1 t. paprika
1 t. salt
( these are just approximate, I just kinda eyed it.)

Mix all marinade ingredients together in a bowl (minus the paprika which you use to sprinkle on top). Place 4 chicken breasts in casserole dish smother in marinade and refrigerate 5-8 hours or overnight. Bake at 350 for 40-60 minutes.

This is an Indian inspired recipe and its delicious. Not something I would want on a weekly basis, but something special when you are tired of the same old thing. It is perfectly accompanied with couscous or rice. So if you are needing a little spice in your life, try it out. Love, Amy.

Sweet Sour Cream Cornbread...


Ingredients

1 cup all-purpose flour
1 cup cornmeal
1/4 cup sugar
1/2 teaspoon baking powder
1/2 teaspoon baking soda
1/2 teaspoon salt
1 egg, lightly beaten
1 cup sour cream
1/3 cup milk
1/4 cup butter, melted

Directions

In a large bowl, combine the flour, cornmeal, sugar, baking powder, baking soda and salt. Combine the egg, sour cream, milk and butter; stir into dry ingredients just until moistened.
Pour into a greased 8-in. square baking dish. Bake at 400 degrees F for 20-25 minutes or until a toothpick inserted near the center comes out clean. Serve warm.

Isn't cornbread just wonderful. I mean really, if its part of your meal, do you care what else is on your plate? And yet its rarely the topic of conversation, that's just a shame. I've used this recipe several times, and its turned out great every time. Really yum, lets start talking about cornbread! Love, Amy

Thursday, February 11, 2010

Caramel Love...


Ingredients:
2 c. heavy cream
1/2 c. condensed milk
2 c. light corn syrup
1/2 c. water
2 c. granulated sugar
1/2. butter (softened, cut into small cubes)

Preparation:

1. Prepare a 9x9 pan by lining it with aluminum foil and spraying the foil with nonstick cooking spray.

2. Combine the cream and condensed milk in a small saucepan, and place the saucepan on a burner set to the lowest heat setting. You want the milk and cream to be warm, but do not allow it to boil.

3. In a medium-large saucepan combine the corn syrup, water, and granulated sugar over medium-high heat. Stir the candy until the sugar dissolves, then use a wet pastry brush to wash down the sides of the pan to prevent sugar crystals from forming and making the candy grainy.

4. Insert a candy thermometer and reduce the heat to medium. Allow the mixture to come to a boil and cook until the thermometer reads 250 degrees.

5. Add the softened butter chunks and the warm milk-cream mixture. The temperature should go down about 30 degrees.

6. Continue to cook the caramel, stirring constantly so that the bottom does not scorch. Cook it until the thermometer reads 244, and the caramel is a beautiful dark golden brown.

7. Remove the caramel from the heat and immediately pour it into the prepared pan. Do not scrape candy from the bottom of the saucepan. Allow the candy to sit overnight to set up and develop a smooth, silky texture.

8. When you are ready to cut the caramel, place a piece of waxed paper on the counter and lift the caramel from the pan using the foil as handles. Flip the top of the caramel onto the waxed paper and peel the foil layer from the bottom of the caramel.

9. Spray a large knife with nonstick cooking spray. Firmly cut into the caramels, creating 1” squares. Wipe the blade and re-spray as necessary.

10. Wrap the squares in waxed paper. The caramels will gradually spread and lose their square shape if not wrapped soon after cutting. Alternately, you can dip them in chocolate once they are cut.

11. Store the caramels at room temperature for up to two weeks.


These soft caramels have a creamy, chewy texture that melts in your mouth! They can be dipped in chocolate, or used in other baked goods! For the best texture, allow the caramels to sit at room temp overnight.

I LOVE CARAMELS!!!

I can mark making homemade caramels off my "things I want to do in my life-time" list. I made these for my sweet husband for Valentines day, he shares my affection for this confection! I was so happy my first attempt was a success! But two things I can say I definitely learned in the process: 1. not a good idea to use a plastic spoon when making something that needs to reach a temp. of 250 degrees, and 2. it might be nice to have a movie to watch during all that stirring (get ready for your hand to fall off ) These candies were totally worth the work. Happy Valentines Day! Love, Amy.

"Many are the sorrows of the wicked, but steadfast LOVE
surrounds the one who trusts in the LORD." ~Psalm 32:10

(recipe from About.com, Elizabeth LaBau, soft caramels)

Tuesday, February 9, 2010

Valentine Dough Ornaments


Love is patient, love is kind. It is not jealous, love is not pompous, it is not inflated,

it is not rude, it does not seek its own interests, it is not quick-tempered, it does not brood over injury,

it does not rejoice over wrongdoing but rejoices with the truth.

It bears all things, believes all things, hopes all things, endures all things.

Love never fails.

1 Cor:13 4-8

This dough is about as easy, literally, as 1, 2, 3, and just about as inexpensive. Two really huge reasons why we love it so much at our house. It's really variable and can be used for as many seasonal decorative purposes as your imagination will allow. This year I wanted more Valentine color around our house... and these ornaments turned out to be exactly what I was looking for!
Dough Art
2 cups flour
1 cup table salt
1 cup water
  • Blend the salt and flour together, then add the water a little at a time.
  • Knead for 7 to 10 minutes until firm.
  • Roll out dough, cut with cookie cutters or shape by hand...
  • If you want to hang them remember to use a drinking straw to cut out a hole for string.
  • Bake at 325 degrees for 35 to 60 minutes depending on size and thickness.
  • WATCH CAREFULLY! If air bubbles occur poke with a needle
  • Allow to cool on wire rack.
  • Then paint as desired. I spray painted ours and then had my kids finish them off with red.
I hung them on the wall using the clay sticky thumb tack that you can find in the office section of most stores.
Happy Valentines Day...
Enjoy and Be Blessed!
Love, Jocelyn


Mango Blueberry Scones...


Ingredients :
3 c. of flour ( I used 2 cups white, 1/2 wheat and 1/2 oats and a handful of flax seed meal)
1/2 c. sugar
2 tsp. baking soda
1/2 tsp. salt
1 cube of butter
1 egg
3/4 c. milk (to my milk, I put a big glob of sour cream , 1 tsp. vanilla extract and 1 tsp. lemon juice )
1 to 1 1/2 c. of frozen blueberries/mangoes (total)
2 T. orange zest!

Place dry ingredients in bowl. Cut in cube of butter with pastry cutter. (Quite a good little work out for the wrists ;) The butter should be cold. Once you get it to a coarse meal look, mix in wet ingredients. Then gently fold in fruit. Get your hands floured and on a lightly floured surface shape dough into a circle. Cut into pie-shaped wedges. Bake at 375 for 15-20 minutes.

*optional: I brushed the top of the scones with a lightly beaten egg and sprinkled with raw sugar.

They used to make a very similar scone at the church coffee shop I used to work at. It was love at first bite. They are very comforting. You can mix up the fruit part to anything that you may have fresh or frozen or dried at your house! If I would have had some coconut, I would have thrown that in there too. Be creative... so far, I haven't had a scone I didn't like. Don't forget a hot cup of tea alongside. Love, Amy.

Monday, February 8, 2010

Spicy Sweet Chipotle Pork Roast


Howdy! One of Jon and I's favorite meals is a big ole pulled pork sandwich. As we we're devouring this spicy-sweet version last night, I said "now this is a man's sandwich", Jon agreed. The best part is that it involves a crock-pot.

Ingredients:

Pork roast 4-5 pounds.
Your favorite hoagie rolls or sandwich rolls.

Sauce:
1 cup ketchup
1 cup chipotle bbq sauce
chopped onion
1 1/2 tsp apple cider vinegar
2 tsp worsh. sauce
1 diced red pepper
sprinkle of crushed red pepper
garlic, salt and pepper to taste

Place roast in the crock pot. Mix sauce ingredients together and pour over roast. Cook for 5 hours on high. Check while cooking if sauce is drying up too much you may add some water. It is as easy as it sounds.
This will fill your house with an amazing aroma and dinner excitement! Roast will just fall apart and melt in your mouth. Put some on your roll and a little sauce and enjoy!

(recipe adapted from Better Homes and Garden's )

Friday, February 5, 2010

Creamy Tortellini Soup

Like a shepherd he feeds his flock;
in his arms he gathers the lambs,
carrying them in his bosom,
and leading the ewes with care.
Isaiah 40:11
This time of year I love to sit in my rocking chair, pulled right up to my living room window, and watch the weather take it's toll on my hillside. I thoroughly enjoy the sound of the rain pounding on my roof, and watching the trees dance in response to the punishing wind... as if to say "Is that all you got?". I find it magnificent, and breathtaking... but I also find it.... COLD.
I made this soup on a day just like the one I described above... lovely to watch, but nasty to be out in. There's something about knowing there's a crockpot full of warm, delicious soup that warms me right to the core and gives me permission to fully enjoy the majesty of God's work outside. This soup fit the bill perfectly, and was DELICIOUS, EASY, AND INEXPENSIVE. A triple whammy of wonderfullness I'd say!
Creamy Tortellini Soup
In a 3 1/2 to 4 quart slow cooker place:
  • 1 1.8 ounce envelope white sauce mix

Gradually add

  • 4 cups water (I just decided this would be much better using all broth and no water... adjust salt accordingly :)

Whisk together until smooth (I couldn't find the packet of white sauce mix at the grocery store so I bought a packet of alfredo sauce... but it didn't look right to me after I mixed all that water in... so I made a roux with a little butter, flour, and milk... (about 2 - 3 Tablspoons butter and maybe 1/4 cup flour) in a frying pan on med heat until well combined and light golden brown.... I added about 1 1/2 cups of milk directly into the pan all at once and whisked until smooth, then added to the slow cooker)

Stir in:

  • 1 14 ounce can vegetable broth ( I used chicken )
  • 1 1/2 cups sliced fresh mushrooms
  • 1 small onion chopped
  • 3 cloves minced garlic
  • 1 yellow bell pepper chopped (my addition)
  • 1/2 teaspoon dried crushed basil
  • 1/4 teaspoon dried crushed oregano
  • 1/4 teaspoon salt (I added more to taste when done cooking)
  • 1/8 teaspoon cayenne pepper

I chose to saute the veggis in 1 Tablespoon of butter before adding them to the slow cooker (see above picture) just to increase their flavor in the soup... but it wasn't part of the recipe, so you can do either.


Cover your slow cooker with a lid and cook on low for 5 to 6 hours or high for 2 1/2 to 3 hours

After that time has passed, add

  • 1- 7-8 ounce package of dried tortellini

Cover and cook on low heat for 1 hour or high for 45 minutes.


Then stir in:

  • 1- 12ounce can of evaporated milk
  • 6 cups of fresh baby spinach leaves (I honestly didn't measure my spinach I just added handfulls until it looked good to me)

Ladle into soup bowls


Sprinkle each serving with shredded parmesean cheese and freshly ground black pepper to taste (my addition).

This recipe is definately one that will be coming back to my slow cooker soon! Enjoy and be blessed!

Love, Jocelyn

Recipe adapted from Biggest Book of Slow Cooker Recipes

Thursday, February 4, 2010

English Muffin Bread


"I am the bread that came down from heaven. Whoever eats my flesh and drinks my blood has eternal life, and I will raise him on the last day. For my flesh is true food, and my blood is true drink "
John 6:41,54-55
Amy and I met in junior high school, and one of our many shared experiences was English class. Our teacher was not a favorite among the students, but for some reason she loved the two of us, which naturally endeared her to us. When she said the word "English" she pronounced it with a strong 'a' sound like Anglish... I can't remember whether we loved that or not but we decided to pronounce it just like Mrs. Johnson.
We dreamed of Angland and exploring as only Amy and Jocelyn can... overly packed, with tons of snacks, and embracing hysteria. We haven't made it there yet... but, so far, we haven't heard the fat lady sing, and we haven't given up hope that one day we just may head on over to Bonny Angland and explore. In honor of all things wonderfully Anglish... here is a perfect recipe for an easy, delicious, and... as far as home-made bread goes, quick dinner accompaniment.
English or Anglish Muffin Bread
In electric mixer thoroughly combine:
  • 2 packages dry yeast (or 2 Tablespoons)
  • 3 cups flour (6 cups total for the recipe)-you can use whatever type of flour in whatever amounts to suit your preference... I like to use 1 cup white with 2 cups whole wheat as the bread doesn't rise as well with all whole wheat.
  • 1 Tablespoon sugar
  • 2 teaspoons salt
  • 2 Tablespoons ground flax meal or whole flax seeds (my addition for extra omega 3's :)

In microwaveable glass bowl combine:

  • 2 cups milk (from skim to whole it's your choice... they all work)
  • 1/2 cup water

Heat liquids till very warm between 120 and 130 degrees.

Add to dry ingredients and beat really well.

Add remaining 3 cups of flour and mix until completely incorporated. I also knead it for a few minutes, about 5, to help release the gluten, but it's not necessary.

Grease and cornmeal the bottoms and sides of two loaf pans. Just shake it around until the bottom and sides are coated. In the past I have omitted this step because it makes the bread messy for slicing, but it really has a purpose. It keeps the bread away from direct contact with the sides of the pan and keeps the crust much more tender.

Then separate the dough into two pieces and form loaves and place in the prepared pans. Sprinkle tops of the loaves with cornmeal. Cover and allow to rise in a warm place until doubled. About 45 minutes... maybe longer when using whole grain flours.


Bake in a preheated 400 degree oven for 20 to 25 minutes. When the loaves are done they should sound hollow when the tops are gently tapped. Remove immediately from pans and cool on wire rack.

When the loaves have cooled a little... slice with a bread knife and you're ready to serve it!
My Daddy made this all the time when I was growing up, and it still makes me feel safe, loved and well cared for every time I bite into a slice of it. One bonus of this bread is that it is EXCELLENT toasted for breakfast the next morning... if there's any of it left!
Enjoy and be blessed... Love, Jocelyn
Recipe adapted from my Father's recipe box